Deployment
How to Deploy NebulaGraph on Kubernetes

What is Kubernetes
Kubernetes is an open-source platform for managing containerized applications on multiple hosts on a cloud platform. Kubernetes is designed to enable users to deploy containerized applications simply and efficiently. It provides users with a set of mechanisms to deploy, plan, update, and maintain their applications.
Architecturally, Kubernetes provides a series of building blocks for users to deploy, maintain, and scale applications. The components that make up Kubernetes are loosely coupled and scalable, aiming to support a variety of workloads. Scalability is primarily enabled by the Kubernetes APIs, which are primarily used as internal components for scaling and as containers running on Kubernetes.
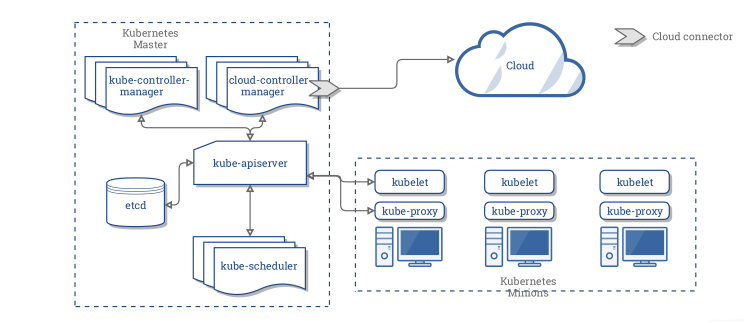
Kubernetes consists mainly of the following core components:
etcd. Stores the states of the entire cluster.kube-apiserver. Provides the only entry for operating the resources, and provides operations of validation, authentication, access control, and API registry and finding.kube-controller-manager. Watches the state of a cluster, for example, fault detection, autoscaling, and rolling updates.kube-scheduler. Schedules the resources. The scheduler assigns the Pods to the corresponding nodes according to the pre-defined scheduling policy.kubelet. Maintains the life cycle of the containers and manages the Volume and the network.kube-proxy. Provides Service with the service discovery and load balancing within the cluster.
Kubernetes and Databases
Database containerization is a big hit right now, so what can Kubernetes bring to databases?
- Failure recovery: Kubernetes provides the failure recovery feature. If a database is deployed on Kubernetes, when the application goes down, Kubernetes enables it to restart automatically or migrate to another node in the cluster.
- Storage management: Kubernetes supports various storage solutions, so a database deployed on it can transparently use different storage solutions.
- Load balancing: Kubernetes Service provides load balancing capabilities, so it can balance external access to different replicas of database instances.
- Horizontal scalability: Depending on the resource utilization of the database cluster, Kubernetes can scale the number of replicas to improve resource utilization.
So far, many databases, such as MySQL, MongoDB, and TiDB, work well on Kubernetes clusters.
NebulaGraph in Practice on Kubernetes
NebulaGraph is a distributed open-source graph database. It has three major components: nebula-graphd for Query Engine, nebula-storaged for data storage, and nebula-metad for metadata. Kubernetes brings the following benefits to NebulaGraph:
- Kubernetes can balance the loads between different replicas of nebula-graphd, nebula-metad, and nebula-storaged. They can discover each other automatically through the domain service of Kubernetes.
- With StorageClass, users do not need to perceive the design of PVC (PersistentVolumeClaim) and PV (PersistentVolume). Kubernetes can transparently access the local volumes or cloud storage.
- The deployment of a NebulaGraph cluster on Kubernetes takes only seconds and Kubernetes can also enable upgrade of the cluster not perceived by users.
- Kubernetes enables automatic recovery of a NebulaGraph cluster. If a single replica crashes, Kubernetes can automatically recover it without human intervention.
- Kubernetes can scale a NebulaGraph cluster elastically based on the resource utilization to improve its performance.
Now, let me introduce this practice in detail.
Cluster Deployment
Software And Hardware Requirements
These are the specifications of the hardware and operating system involved in this practice:
- The operation system is CentOS-7.6.1810 x86_64.
- Virtual machine configuration:
- 4 CPU
- 8G memory
- 50G system disk
- 50G data disk A
- 50G data disk B
- Kubernetes version: v1.14 or later
- NebulaGraph version: v2.0.0-rc1
- Data storage: Local PV
- CoreDNS version: 1.6.0 or later
Planning of the Cluster
This table lists how the cluster is composed.
| Server IP | Nebula Services | Role |
|---|---|---|
| 192.168.0.1 | master | |
| 192.168.0.2 | graphd, metad-0, storaged-0 | node |
| 192.168.0.3 | graphd, metad-1, storaged-1 | node |
| 192.168.0.4 | graphd, metad-2, storaged-2 | node |
Components to Be Deployed
- Helm 3
- Local volume and the plugin for the local volume
- NebulaGraph
Install Helm 3
Helm is a package manager for Kubernetes. Helm can ease the deployment of an application on Kubernetes. I will not cover the details of Helm in this article. If you are interested, please refer to Quickstart Guide of Helm. In this practice, Helm 3 is used.
- Download and Install Helm 3: Open a terminal and run these lines.
$ wget https://get.helm.sh/helm-v3.5.2-linux-amd64.tar.gz
$ tar -zxvf helm/helm-v3.5.2-linux-amd64.tgz
$ mv linux-amd64/helm /usr/bin/helm
- View the Helm Version
To view the version of Helm, run helm version. In this example, the following line is returned.
version.BuildInfo{Version:"v3.5.2",
GitCommit:"167aac70832d3a384f65f9745335e9fb40169dc2",
GitTreeState:"dirty", GoVersion:"go1.15.7"}
}
Configure the Local Volume
On each server, complete these configurations:
- Create a mount point named
/mnt/disks.
$ sudo mkdir -p /mnt/disks
- Format the data disks.
$ sudo mkfs.ext4 /dev/diskA
$ sudo mkfs.ext4 /dev/diskB
- Mount the data disks on the mount point.
$ DISKA_UUID=$(blkid -s UUID -o value /dev/diskA)
$ DISKB_UUID=$(blkid -s UUID -o value /dev/diskB)
$ sudo mkdir /mnt/disks/$DISKA_UUID
$ sudo mkdir /mnt/disks/$DISKB_UUID
$ sudo mount -t ext4 /dev/diskA /mnt/disks/$DISKA_UUID
$ sudo mount -t ext4 /dev/diskB /mnt/disks/$DISKB_UUID

$ echo UUID=`sudo blkid -s UUID -o value /dev/diskA` /mnt/disks/$DISKA_UUID ext4 defaults 0 2 | sudo tee -a /etc/fstab
$ echo UUID=`sudo blkid -s UUID -o value /dev/diskB` /mnt/disks/$DISKB_UUID ext4 defaults 0 2 | sudo tee -a /etc/fstab
- Install the plugin for the local volume.
$ curl https://github.com/kubernetes-sigs/sig-storage-local-static-provisioner/archive/v2.4.0.zip
$ unzip v2.4.0.zip
- Modify the
classessection inv2.4.0/helm/provisioner/values.yaml: ReplacehostDir: /mnt/fast-diskswithhostDir: /mnt/disksand delete the#from# storageClass: true. And then run the following command:
$ helm install local-static-provisioner --namespace default sig-storage-local-static-provisioner/helm/provisioner

# View the deployment of local-static-provisioner
$ helm list
NAME                        NAMESPACE   REVISION    UPDATED                                 STATUS      CHART               APP VERSION
local-volume-provisioner    default     1           2021-02-10 11:06:34.3540341 +0800 CST   deployed    provisioner-2.4.0   2.4.0
Deploy a NebulaGraph Cluster
Download nebula-charts
# Download nebula-charts
$ helm repo add nebula-charts https://vesoft-inc.github.io/nebula-docker-compose/charts
$ helm pull nebula-charts/nebula
$ tar -zxvf nebula-0.2.0.tgz
Set Up the Kubernetes Nodes
The following table lists all the nodes of the Kubernetes cluster. Some nodes must be labeled for scheduling. In this example, I labeled 192.168.0.2, 192.168.0.3, and 192.168.0.4 with nebula: "cloud".
| Server IP | kubernetes roles | nodeName |
|---|---|---|
| 192.168.0.1 | master | 192.168.0.1 |
| 192.168.0.2 | node | 192.168.0.2 |
| 192.168.0.3 | node | 192.168.0.3 |
| 192.168.0.4 | node | 192.168.0.4 |
The commands are as follows.
$ kubectl  label node 192.168.0.2 nebula="cloud" --overwrite
$ kubectl  label node 192.168.0.3 nebula="cloud" --overwrite
$ kubectl  label node 192.168.0.4 nebula="cloud" --overwrite
Change Default Values
Here is the hierarchy of the nebula-charts directory.
master/kubernetes/
└── helm
    ├── Chart.yaml
    ├── templates
    │   ├── configmap.yaml
    │   ├── deployment.yaml
    │   ├── _helpers.tpl
    │   ├── NOTES.txt
    │   ├── pdb.yaml
    │   ├── serviceaccount.yaml
    │   ├── service.yaml
    │   └── statefulset.yaml
    └── values.yaml

1 directory, 11 files
You can change the default values in the charts/nebula/values.yaml file to meet your requirements.
Install NebulaGraph with Helm
$ helm install nebula charts/nebula
# View the deployment status
$ helm status nebula
NAME: nebula
LAST DEPLOYED: Fri Feb 19 12:58:16 2021
NAMESPACE: default
STATUS: deployed
REVISION: 1
TEST SUITE: None
NOTES:
NebulaGraph Cluster installed!

1. Watch all containers come up.
  $ kubectl get pods --namespace=default -l app.kubernetes.io=nebula -w
# View the status of the NebulaGraph cluster deployed on K8s
$ kubectl get pods --namespace=default -l app.kubernetes.io=nebula
NAME                             READY   STATUS    RESTARTS   AGE
nebula-graphd-676cfcf797-4q7mk   1/1     Running   0          6m
nebula-graphd-676cfcf797-whwqp   1/1     Running   0          6m
nebula-graphd-676cfcf797-zn5l6   1/1     Running   0          6m
nebula-metad-0                   1/1     Running   0          6m
nebula-metad-1                   1/1     Running   0          6m
nebula-metad-2                   1/1     Running   0          6m
nebula-storaged-0                1/1     Running   0          6m
nebula-storaged-1                1/1     Running   0          6m
nebula-storaged-2                1/1     Running   0          6m
Connect to the Graph Service
$ kubectl get service nebula-graphd
NAME            TYPE       CLUSTER-IP      EXTERNAL-IP   PORT(S)                                          AGE
nebula-graphd   NodePort   10.105.47.116   <none>        9669:31646/TCP,19669:30554/TCP,19670:32386/TCP   22m

# Use nebula-console to test the Graph service.
$ docker run --rm -ti --entrypoint=/bin/sh vesoft/nebula-console:v2-nightly

# Connect to the Graph service with the NodePort mode
/ $ nebula-console -addr 192.168.0.4 -port 31646 -u root -p vesoft
2021/02/19 05:04:55 [INFO] connection pool is initialized successfully

Welcome to NebulaGraph v2.0.0-rc1!

(root@nebula) [(none)]> show hosts;
+---------------------------------------------------------------+------+----------+--------------+----------------------+------------------------+
| Host                                                          | Port | Status   | Leader count | Leader distribution  | Partition distribution |
+---------------------------------------------------------------+------+----------+--------------+----------------------+------------------------+
| "nebula-storaged-0.nebula-storaged.default.svc.cluster.local" | 9779 | "ONLINE" | 0            | "No valid partition" | "No valid partition"   |
+---------------------------------------------------------------+------+----------+--------------+----------------------+------------------------+
| "nebula-storaged-1.nebula-storaged.default.svc.cluster.local" | 9779 | "ONLINE" | 0            | "No valid partition" | "No valid partition"   |
+---------------------------------------------------------------+------+----------+--------------+----------------------+------------------------+
| "nebula-storaged-2.nebula-storaged.default.svc.cluster.local" | 9779 | "ONLINE" | 0            | "No valid partition" | "No valid partition"   |
+---------------------------------------------------------------+------+----------+--------------+----------------------+------------------------+
| "Total"                                                       |      |          | 0            |                      |                        |
+---------------------------------------------------------------+------+----------+--------------+----------------------+------------------------+
Got 4 rows (time spent 2608/4258 us)
FAQ
How to create a Kubernetes cluster?
To create a highly-available Kubernetes cluster, refer to the docs: https://kubernetes.io/docs/setup/production-environment/tools/kubeadm/high-availability/.
How to adjust the parameters for deploying a NebulaGraph cluster?
Use --set in the helm install command to overwrite the variables in the values.yaml file under the nebula-charts directory. For more information, refer to https://helm.sh/docs/intro/using_helm/
Can I follow this process to deploy NebulaGraph v1.0.0+ on Kubernetes?
NebulaGraph v1.0.0+ does not support parsing internal domain names. To deploy a cluster of NebulaGraph v1.0.0+, you must modify the charts/nebula/values.yaml file as follows:
hostNetwork: true
metadEndpoints: []
  - 192.168.0.2:9559
  - 192.168.0.3:9559
  - 192.168.0.4:9559
How to access the internal components of NebulaGraph from the outside of a K8s cluster?
In this example, the Graph service is accessed via the NodePort mode. You can also access it via the hostPort, hostNetwork, Ingress, or LoadBalancer mode. You can choose the appropriate option to meet your environment requirement.
How to view the status of the deployed NebulaGraph cluster?
Run the kubectl get pods --namespace=default -l app.kubernetes.io=nebula command. Or use Kubernetes Dashboard to view the status of the cluster.
How to use other types of storage solutions?
Refer to https://kubernetes.io/zh/docs/concepts/storage/storage-classes/